TL;DR
A closet can serve as a surprisingly good vocal booth if you prioritize proper placement, acoustic treatment, and ventilation. Moving your rig out of sight and earshot is often more effective than buying endless foam panels. Proper sealing and airflow management are key to avoiding heat buildup and sound leaks.
Ever thought your closet could double as a vocal booth? Turns out, it can—if you know the trick. Most people focus on foam and absorption, but the real game-changers are placement, sealing gaps, and managing heat. You don’t need fancy construction; just smart tweaks and a bit of strategic thinking.
Whether you’re recording vocals, streaming, or doing voiceovers, understanding how sound moves and how to control it will make your life easier. This isn’t about turning your closet into a professional studio—it’s about making it good enough to sound clear, warm, and free of echo. Ready to turn that tiny space into a quiet, effective zone? Let’s go.
Acoustic dampening
& the rig in the closet.
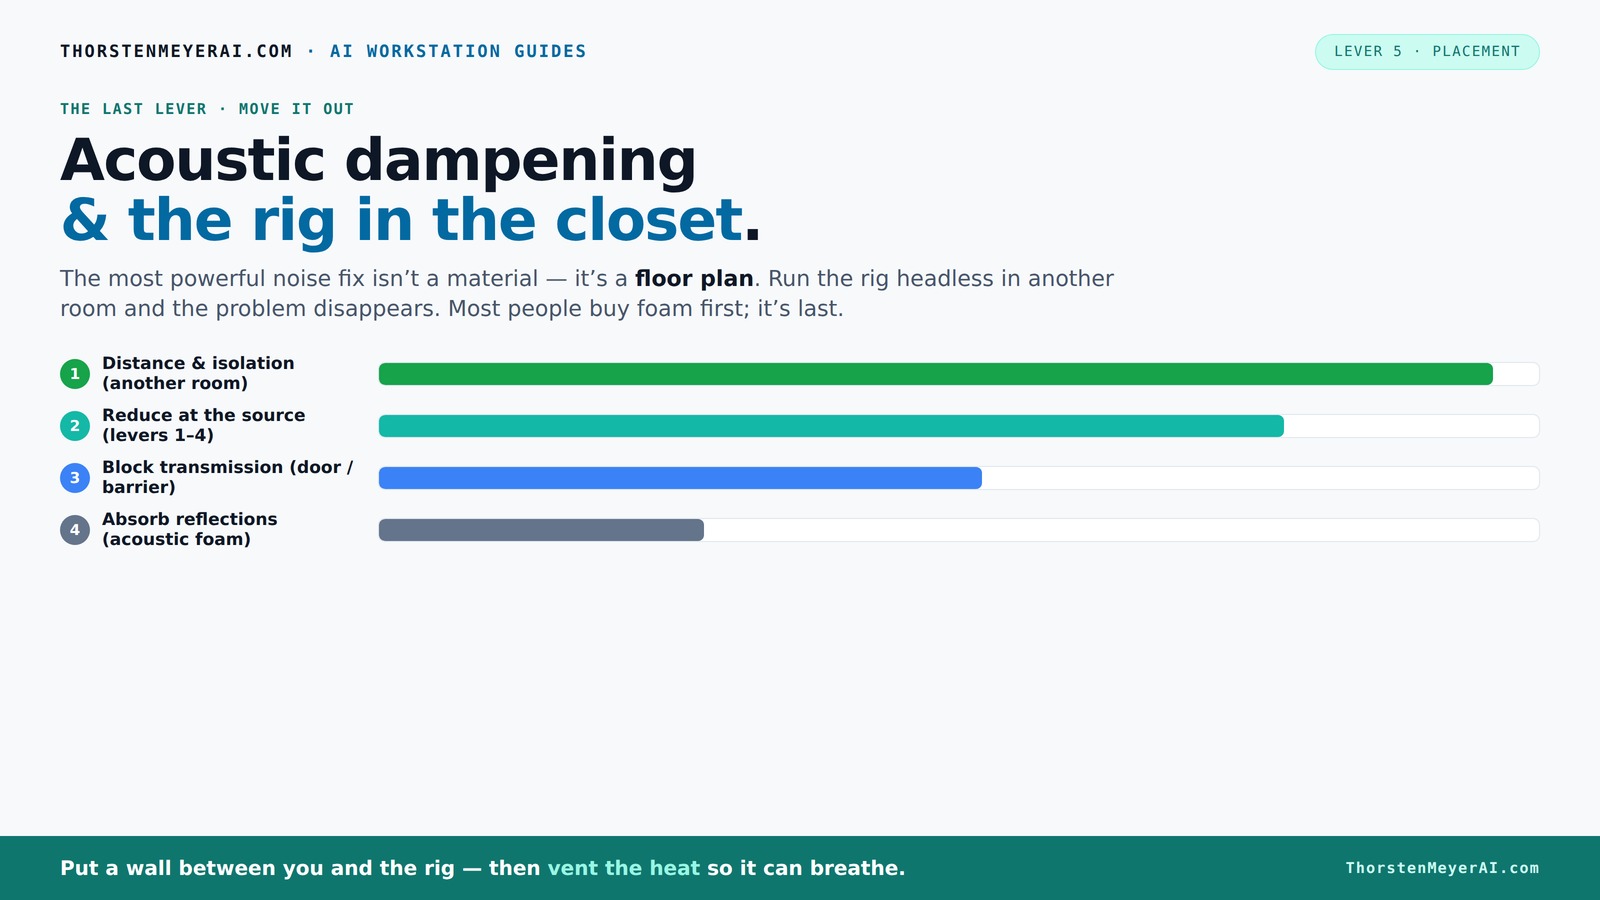
The most powerful noise fix isn’t a material — it’s a floor plan. A rig you can’t hear because it’s in another room beats any amount of foam. Tap the approaches in Part 1 to see what actually works.
(another room)
(levers 1–4)
(door / barrier)
(acoustic foam)
Contain the noise, not the heat
Key Takeaways
- Moving your rig to another room is the most effective noise reduction, especially for AI workloads.
- Proper ventilation is crucial when placing a computer in a closet—airflow prevents heat buildup and noise from throttling.
- Acoustic treatment focuses on reflections and low-end control—use bass traps, reflection points, and blankets for best results.
- Sealing gaps around doors and cracks reduces sound leaks dramatically—use acoustic sealant and weatherstripping.
- Small improvements like rugs, clothing, and reflection filters can transform a muddy, echoey closet into a clear-sounding space.

VEVOR Portable Vocal Booth, 6.56 ft Height, Portable Recording Studio with Travel Bag, Mobile Tablet Stand, Thickened Soundproofing, Sound Isolation Booth for Echo-Free Vocals, Podcasts, Voiceovers
Say Goodbye to Echoes: Built with durable Oxford cloth and acoustic padding, this recording booth for the home...
As an affiliate, we earn on qualifying purchases.
As an affiliate, we earn on qualifying purchases.
Why Moving Your Rig Out Is the Most Powerful Noise Solution
Placing your computer, audio interface, or microphone in a different room is by far the most effective way to reduce noise. Unlike foam or barriers, distance cuts sound transmission at its root. Think of it like this: a loud GPU in another room, connected via Ethernet, is quieter than any foam lining your desk.
For example, a friend moved his noisy AI rig into a closet on the other side of his basement. The noise vanished from his workspace, and he only accessed it remotely. The setup was simple—strong wired connection and ventilation. This approach turned an annoyance into a non-issue.
In practice, this is the easiest fix that costs almost nothing—just a good network and some airflow. It’s perfect for an AI inference rig where you don’t need to be physically next to the hardware.

Focusound 52 Pack Acoustic Foam Panels 1" x 12" x 12" Sound Proof Foam Panles Soundproofing Noise Cancelling Wedge Panels for Home Office Recoding Studio with 300PCS Double-Side Adhesive
Soundproofing - Acoustic foam panels triangular grooves structure for better noise absorption, helps to reduce and absorb unwanted...
As an affiliate, we earn on qualifying purchases.
As an affiliate, we earn on qualifying purchases.
The 'Rig in the Closet' Trick — Ventilation Matters More Than You Think
Putting a high-power, heat-generating machine into a closet sounds perfect for noise reduction—until you realize heat becomes a problem. Sealed spaces trap hot air, causing temperatures to skyrocket. A GPU running at 80°C in a sealed closet will heat the air, leading to throttling or even shutdown.
To make a closet rig work, you need airflow. This means installing passive vents, exhaust fans, or even ducted systems with thermostatic controls. Purpose-built soundproof cabinets combine absorption with active ventilation, keeping things cool and quiet at the same time.
For example, a streamer I know installed a quiet exhaust fan in his closet rig. It kept temperatures stable and noise levels down. The key is to never fully seal the space without a way for heat to escape—otherwise, your rig becomes a hot mess.

Weather Stripping Door Seal Strip - Soundproof Q-Shaped Foam for Exterior Door Frame, Large Gap Seal, Noise Cancelling, Easy to Install (Black, 26FT)
No light penetration: Our door seals are made of high-density foam core material, which effectively blocks light from...
As an affiliate, we earn on qualifying purchases.
As an affiliate, we earn on qualifying purchases.
Acoustic Treatment vs. Soundproofing: What's the Difference?
Acoustic dampening and soundproofing are often mixed up, but they serve different purposes. Acoustic treatment reduces echoes and reflections inside a space—think foam panels and diffusers. Soundproofing, on the other hand, stops sound from leaving or entering the room—think mass, sealing gaps, and barriers.
In a closet, adding foam on the walls will soften reflections but won't stop sound leaks through gaps or the door. To truly soundproof, you need to seal cracks with acoustic sealant, add mass to walls (drywall + damping), and consider door seals.
For example, sealing gaps around the closet door with acoustic weatherstripping drastically reduces sound escape. Meanwhile, placing bass traps in the corners tackles low-end issues—something small closets often struggle with.

Amico 10" Shutter Exhaust Fan with Remote, 9-Speed Energy Efficient & Quiet 13W DC Motor 1000 CFM Wall Mount Ventilation Fan for Garage,Greenhouse,Attic & Chicken Coop,Plug & Play,8-Hour Timer,FCC
【Pays for Itself via 13W DC Motor】 Cut your utility bills by 76% compared to outdated AC models....
As an affiliate, we earn on qualifying purchases.
As an affiliate, we earn on qualifying purchases.
How to Treat a Small Closet for Clear, Warm Recordings
Start with reflection points: place acoustic panels at the wall behind your mic and at any nearby surfaces that bounce sound. Small closets often create a boxy, boomy sound—adding bass traps in corners helps tame low-end buildup.
Use thick blankets, clothing, or reflection filters to soften high-frequency bounce. Rugs or carpets on the floor reduce reflections and dampen room tone. If you notice echo or muddiness, add more absorption at reflection points or corners.
For example, a YouTuber added a 4-inch foam panel behind his microphone and placed thick blankets on the door and ceiling. The result? Warmer, clearer vocals with less echo, all without permanent construction.
Where Bass Traps and Corner Treatments Make the Biggest Difference
Bass buildup is common in small, tight spaces—think of it as a low-frequency echo you can’t get rid of with just foam. Bass traps in the corners absorb these troublesome frequencies, preventing that muddy, boomy sound.
In a closet, placing 4-inch thick bass traps in the corners—especially where walls meet the ceiling—is a game-changer. It controls low-end rumble and gives your voice clarity.
For instance, I installed DIY bass traps in my closet corner, and my recordings transformed. No more boomy lows—just tight, controlled sound. It’s a small investment with a huge payoff.
Sealing Gaps & Doors: The Hidden Weak Points in Closet Soundproofing
Cracks, gaps, and even the door itself are major sound leaks. Acoustic sealant or weatherstripping around doors and windows makes a huge difference. Standard caulk shrinks or cracks over time, so use specialized acoustic sealant for best results.
For example, sealing the closet door with weatherstripping cut noise significantly. Also, adding a heavy curtain or draft blocker over gaps helps trap sound inside.
Don’t forget the floor—placing a rug or thick blanket under the door helps seal the bottom gap. These small fixes are surprisingly effective.
Floor and Ceiling: Small Changes, Big Impact
Floors and ceilings reflect sound, creating echo and muddiness. Laying down a thick rug or carpet absorbs high frequencies and reduces bounce. Overhead absorption panels or hanging blankets can dampen ceiling reflections.
In my setup, a simple rug cut down on echo, making voice recordings much clearer. For ceilings, hanging a quilt or acoustic panel also helped control reflections without permanent renovation.
These small additions are affordable and quick to implement, turning a boxy space into a more controlled environment.
Do You Need Full Construction or Just Smart Tricks?
Permanent soundproofing—adding drywall, green glue, or insulation—is effective but costly and disruptive. For most home or small studio setups, smart placement, sealing gaps, and using absorbers do the job well enough.
For example, sealing the door and adding bass traps in corners can make a noticeable difference without tearing down walls. If you want serious isolation, then consider structural upgrades, but for most voice work, simple tricks suffice.
This approach saves money and time while still delivering professional-sounding results.
Frequently Asked Questions
Can a closet really be turned into a recording booth?
Absolutely. With proper sealing, absorption, and ventilation, a closet can become a surprisingly effective vocal booth—especially for voiceovers and streaming. It’s about managing reflections and low-end, not just blocking sound.What is the best mic placement in a closet booth?
Place the mic about 6-12 inches from your mouth, slightly off-axis to avoid plosives. Use a reflection filter or a thick blanket behind the mic, and position it away from walls to reduce early reflections and echo.Should I use foam, acoustic panels, or blankets?
Foam and panels help reduce echo and reflections inside the space, but blankets and clothing are quick, low-cost options that absorb high frequencies. Combining both gives the best results in a small closet.Do I need bass traps in a small closet?
Yes. Small spaces often have low-frequency buildup, which creates a muddy sound. Installing bass traps in corners helps tighten the sound and improves clarity.How much wall coverage is enough?
Focus on reflection points behind your mic and in the corners—covering about 20-30% of the wall surface with absorption materials is often enough for a small closet. Over-treating can make the space sound unnatural.Conclusion
Turning a closet into a quiet, effective workspace isn’t about adding endless foam panels. It’s about smart placement, sealing gaps, managing heat, and controlling low frequencies. Think of it as tuning a small instrument—every tweak makes a difference.
Remember, the best setup often costs less than you expect—just a little strategic thinking and some DIY fixes. Your quiet, cozy closet studio awaits. Now, go make it happen.